How Do You Reattach Vinyl Siding To A Starter Strip

Diy Vinyl Siding Corner Repair Youtube
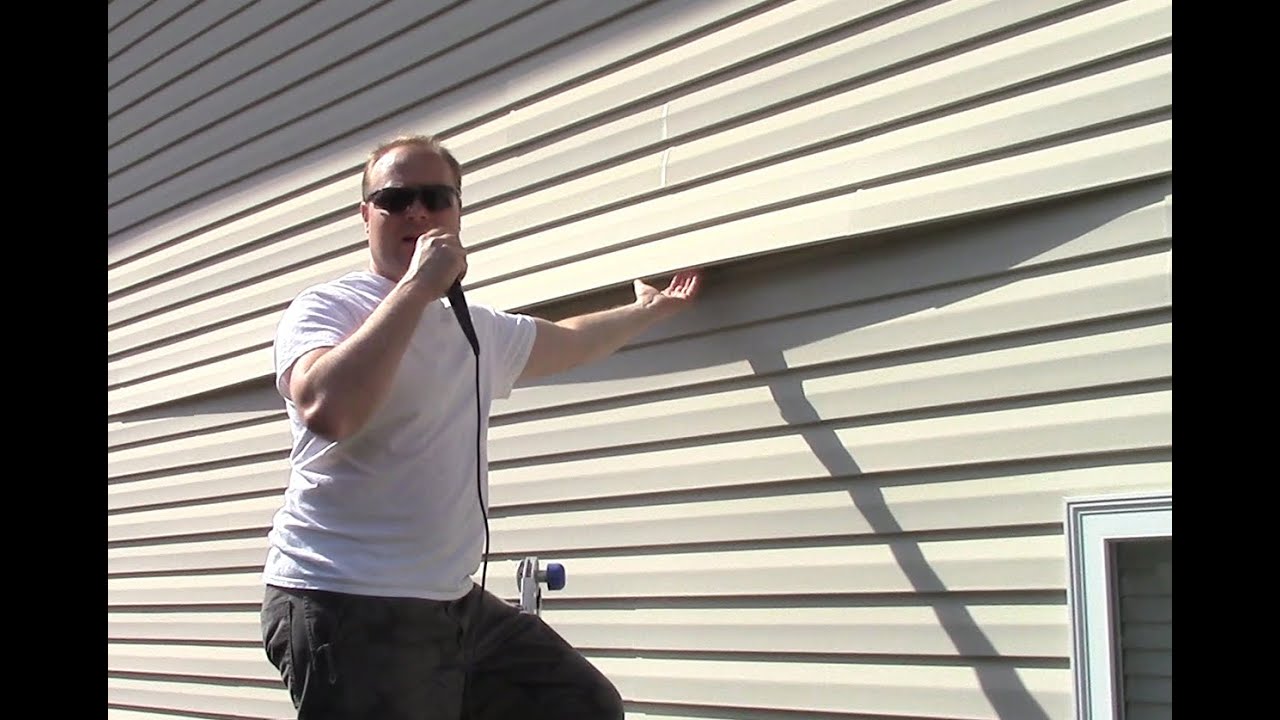
Loose Vinyl Siding Repair Youtube
Removing Vinyl Siding Fine Homebuilding

This Article Explains How To Install Vinyl Siding So That It Looks Good And Doesn T Leak Included Is A Discu Vinyl Siding Vinyl Siding Installation Diy Siding

Starter Strip And Under Sill Trim Vinyl Siding Vinyl Siding Installation Installing Siding

How To Install Vinyl Siding Starter Trim Strips Vinyl Siding Vinyl Siding Repair Siding Repair

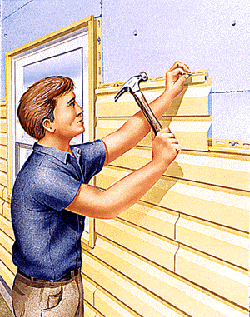
Snap a level chalk line for the first starter strip at the base of the wall no less than 8 inches above ground level after determining the lowest corner of the house.
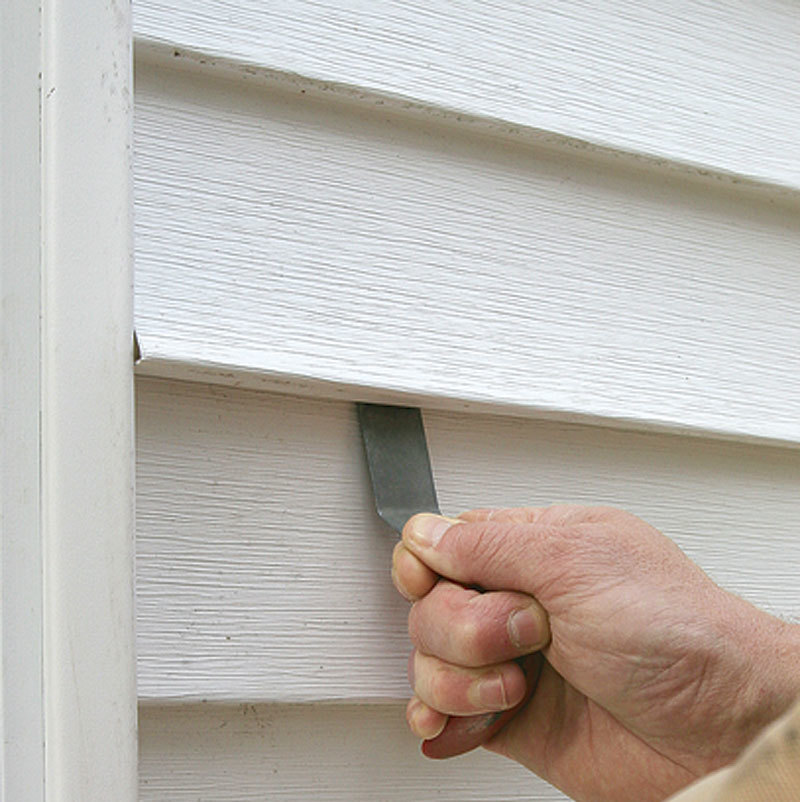
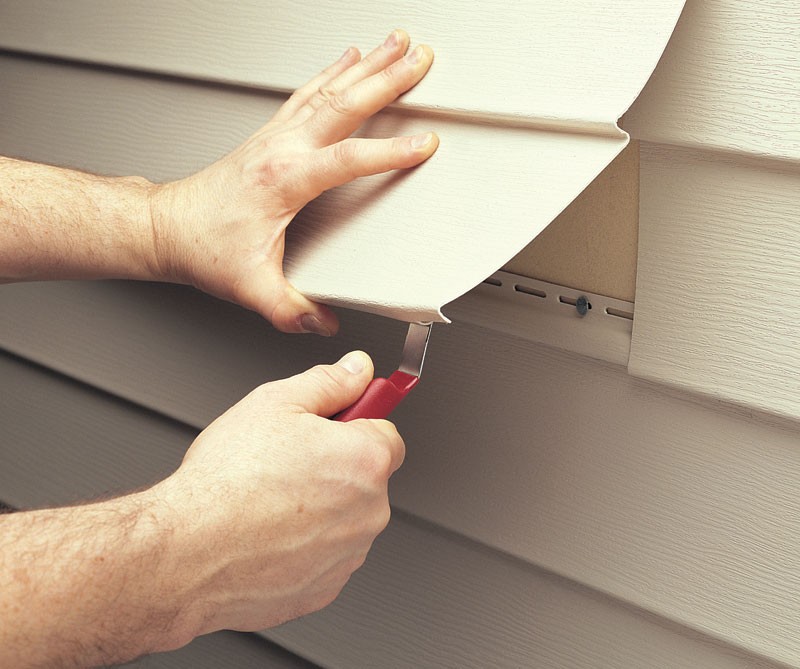
How do you reattach vinyl siding to a starter strip. You attach the bottom of the first row of siding to the top of this starter strip. Measure and mark a point 2 inches 5 1 cm away from each side of the removed segment. Cut the spare piece of vinyl along the marks using straight tin snips. Screw fasteners can be used if the screws do not restrict the normal expansion and contraction movement of the vinyl siding panel on the wall.
Remember to make sure the sheathing is smooth before you apply the siding so the siding can be smooth also. Screws must be centered in the slot with approximately 1 32 0 8mm space between the screw head and the vinyl. Pull the zip tool down while simultaneously. This video shows how to install a starter strip for vinyl and polymer siding installation.
Staret strip secures the first course of siding to the home. This chalk line should be level and a consistent distance from the eaves or the top and bottom of the windows. If it is sagging or has come loose from the outside of your house you canmot just drive a few nails through the siding to reattach it. Vinyl siding starter strips.
This is where the new siding will begin. With vinyl siding the nails are hidden by the row above and it is difficult to get to them. Cut a vinyl patch 4 inches 10 cm wider than the removed segment. Diy how to fix loose vinyl siding with a malco sideswiper siding tool.
For the remaining vinyl siding panels to be installed correct and level beginning with the lowest row you must install the starter strip correctly.

13 Simple Vinyl Siding Installation Tips Installing Siding Vinyl Siding Installation Vinyl Siding

13 Simple Vinyl Siding Installation Tips Vinyl Siding Installation Installing Siding Vinyl Siding

Vinyl Siding Installation Getting Started 2018 Youtube

How To Install Vinyl Siding Vinyl Siding Installation Vinyl Siding Repair Vinyl Siding

How To Install Vinyl Siding Starter Trim Strips Hometips Vinyl Siding Installation Vinyl Siding Installing Siding

13 Simple Vinyl Siding Installation Tips Installing Siding Vinyl Siding Installation Vinyl Siding

Cure For Failing Siding Jlc Online

Soffit And Fascia Installation Trim Bender In 2020 Vinyl Siding Installation Installing Siding Diy Roofing

Vsi Best Practices Finishing At The Top Of The Wall Youtube

Mansard Dormer Siding Options Images Yahoo Image Search Results Home Exterior Makeover Insulated Vinyl Siding House Exterior

Vinyl Siding Installation Instructions For Eaves And Soffit Installations Vinyl Siding Vinyl Siding Installation Installing Siding

How To Prepare Walls For Vinyl Or Aluminum Siding Vinyl Siding Installation Vinyl Siding Replacing Vinyl Siding
How To Safely Remove Vinyl Siding Hgtv

13 Simple Vinyl Siding Installation Tips Vinyl Siding Installing Siding Vinyl Siding Installation

How To Patch A Hole In Vinyl Siding In 3 Minutes Vinyl Siding Repair Vinyl Siding Siding Repair

Vinyl Siding Moldings Trim Vinyl Siding Siding Trim Vinyl Siding Trim

Vinyl Siding Installation Instructions For Eaves And Soffit Installations Installing Siding Vinyl Siding Installation Vinyl Siding

Install Vinyl Trim Around Windows Vinyl Siding Installation Installing Siding Vinyl Siding
Https Encrypted Tbn0 Gstatic Com Images Q Tbn 3aand9gcs7cpzb6be2q7uhkialxyxwzcdiliuaslhjyekbjosnm42z0dty Usqp Cau

Vinyl Siding Calculator Estimate Siding Trim And Material Pricing Inch Calculator Vinyl Siding Siding Trim Vinyl Siding Calculator

View Our Different Vinyl Siding Trim And Accessories And Discover How You Can Dramatically Transform Your Home S Ext Siding Trim Vinyl Siding Vinyl Siding Trim
How To Install Vinyl Siding In 23 Steps Tips On Vinyl Siding Installation

13 Simple Vinyl Siding Installation Tips Vinyl Siding Installation Installing Siding Vinyl Siding

Charter Oak Clapboard Alside Siding In Storm This Pic Just Shows Shape Vinyl Siding Dutch Lap Vinyl Siding Alside Vinyl Siding

How To Install Vinyl Siding Part 1 Of 3 Youtube

Cedar Impressions Double 9 Staggered Rough Split Shakes Shake Shingle Siding Vinyl Siding Polymer Shakes Vinyl Siding Shingle Siding Shake Shingle

Vinyl Siding Foundry Shingle Like Real Cedar Shingle 20 Colors Lifetime Warranty Ebay Vinyl Siding Shake Siding Vinyl Shake Siding
/cdn.vox-cdn.com/uploads/chorus_asset/file/19616856/vinyl_siding.jpg)
How To Replace Damaged Vinyl Siding This Old House

Pin On Future Projects
Vinyl Siding Loose From Starter Strip Doityourself Com Community Forums

Vinyl Siding Prices Vinyl Siding Vinyl Siding Installation Vinyl Siding Prices

Basics For Installing Vinyl Siding By Owner Builders With No Experience Vinyl Siding Vinyl Siding Installation Vinyl Siding Accessories

Vinyl Siding Installation Horizontal Siding Installation Part 2 Of 9 Youtube

How To Snap Siding Back Together Home Guides Sf Gate

Installing Certainteed Cedar Impressions Half Rounds In A Gable Youtube
Pin On Home Decor

Soffit Installation Vinyl Siding Guide Vinyl Siding Institute Vsi

How To Install Vinyl Siding On A Old House Peatix

Certainteed Cedar Impressions Double 9 Staggered Rough Split Shakes Savannah Wicker Roanoke Swva Siding Vi Vinyl Siding Shingle Siding Shake Shingle

How To Remove And Replace A Section Of Vinyl Siding Fine Homebuilding

Upscale Vinyl Siding Home Improvement Loans Custom Home Builders Home Loans

How To Remove Vinyl Siding Easy Youtube

