How Do You Cut An Inside Corner On Rubber Roofing

Form A Flat Roof Internal Corner With Firestone Epdm Youtube

Rubber Roof External Corner Epdm Installation Guides And Training Youtube
Flashings Tapes Commercial Grade Flat Roof Rubber Roofing Systems
Diy Rubber Roof Epdm Repair Learning To Fix Your Flat Roof Cool Flat Roof

Building A Mancave Part 3 Diy Epdm Rubber Roof Installation Youtube

How To Install A Classicbond Epdm Flat Roof Youtube

Lift the upper fold onto the wall.
How do you cut an inside corner on rubber roofing. When you reach the roof s ridge you need to make yet another cut in your drip edge. Strip the protective paper from the termination tape. Beyond the dormer and cut the top section along the dormer edge. I know nothing about rubber roofing other than to say this stuff came off a flat roofed garage so maybe it s thicker stuff and acted as a walkable outdoor deck for the second story of the house.
Then position the trim to the right of the saw. There are two good ways to handle corner flashing. Drive one nail through both. Place a nail at one end then the other.
Bend the flap down and nail along the top edge. Make a straight cut through the bottom of the drip edge with your tin snips. Cut 6 ps uncured cover tape to size and round of corners. Run the base flashing 4 to 5 in.
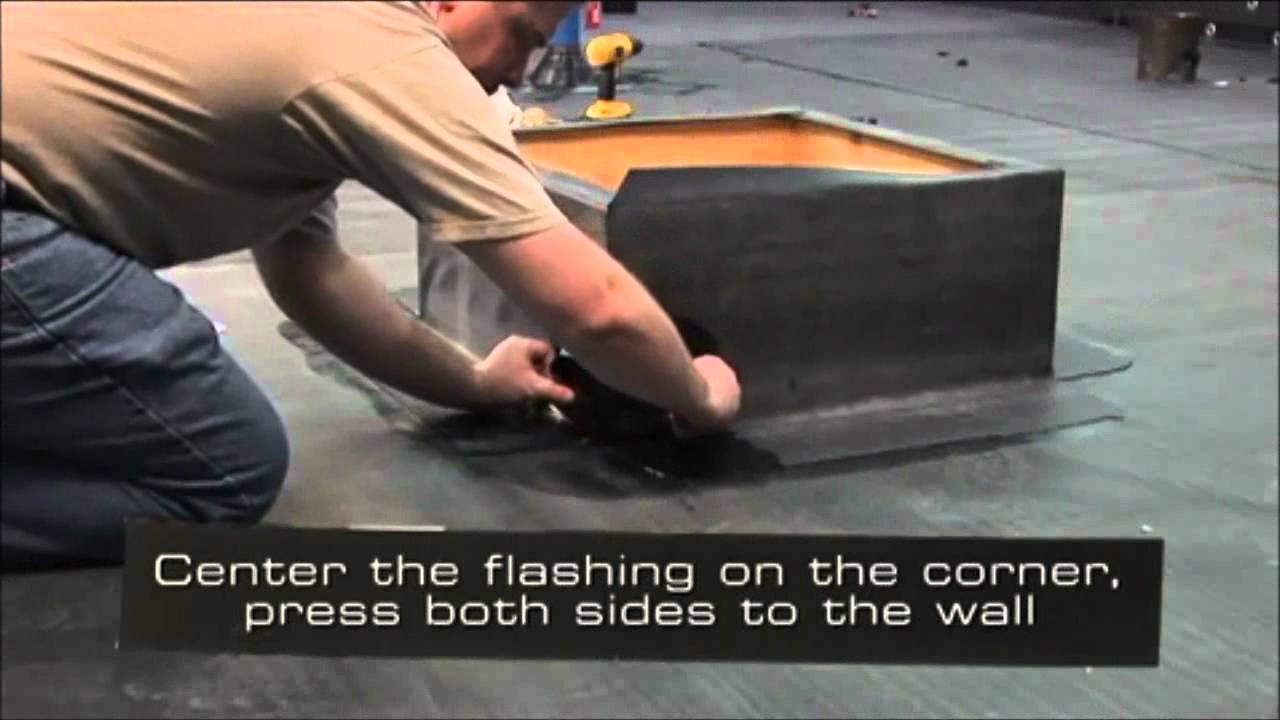
Cut the overlapping piece with the top edge to fit square against the end of the roof and the overhanging edge to fold around the corner. Turn the angle gauge clockwise until it is oriented to the left hand 45 degree angle setting. Lift the second side avoiding contact near the corner. Apply adhesive to the other side.
If you do make sure the nails will not align with any shingle seams or cutouts above. Brief clip of how to cut the rubberbond fleeceback epdm flat roofing membrane at corner details to create upstand details out of the membrane with minimum seams. Cut all the way through the trim to create the corner angle. Cut one piece of drip edge square on both edges to fit against the end of the roof.
You may need to nail through the starter strip into the drip edge. Mark the plumb line. Press the rubber into the termination tape. The roofing membrane used in this.
It is common on long runs to overlap the two sheets by more than 3 and then cut back the top sheet of rubber membrane once the splice tape has been stuck to the bottom sheet. Cut a 45 degree angle in a piece of trim with a miter saw. Fold the drip edge to fit over the ridge. Position the rubber as shown and apply adhesive to the upper fold.
Doing this is similar to cutting an outside corner. Hold the drip edge up to the ridge and make a mark along where the drip edge exceeds the roof. Slide the overlapping corner under the other overhanging piece of drip edge. The first bending two pieces and caulking the joint photos 1 3 is the most common because you can do it on the spot with the flashing at hand.

Pros And Cons Of Rubber Roofing United Home Experts

Economy Interlocking Rubber Paver Roof Walkway Pad 24x24x2 In

How To Install A Rubber Flat Roof Part 5 Internal And External Corner Details Youtube

Rubber Roof Repair How To Fix A Leaking Roof Roofcalc Org

Pros And Cons Of Epdm Roofing United Home Experts

2020 Epdm Rubber Roofing Cost Roofcalc Org

Epdm Roofing Systems Johns Manville

Pin On Rooftop

How To Finish A Flat Roof At Upstand Walls With Epdm Rubber Roofing Systems Made Easy Youtube

Single Ply Flat Roofing Membranes Pvc Tpo Epdm Rubber Roofs Cool Flat Roof

The Pros And Cons Of Using Epdm Roofinglines
Membrane Epdm Rubber Roofing Products Pvc Roofing Rubber Roof Installation Or Repair Guide

Rubber Roof Replacement In Boston Ma Cool Flat Roof Blog

White Epdm Rubber Roofing Membrane 60 Mil 10x100 Ft
Membrane Epdm Rubber Roofing Leak Repair Guide

Rubber Roof How To Install A Rubber Roof

The Complete Guide To Epdm Roofing Roofing Superstore Blog

Bsd 102 Understanding Attic Ventilation Building Science Information Flat Roof Flat Roof Insulation Roof Cladding
Https Encrypted Tbn0 Gstatic Com Images Q Tbn 3aand9gcsht3w7g Rgmtiyty Qg Wdvg05mgsosm Cnolkp06q0pa3 Nu Usqp Cau

Pin On Firestone

Pin On Roofing

Black Epdm Rubber Roofing Membrane 45 Mil 10x50 Ft

Leaking Parapet Walls Parapet Flat Roof Coping Stone

Flat Roof In Lowell Massachusetts Cool Flat Roof Blog

Exterior Remodel Rooftop Deck Stair Construction Manchester Md 21088

Roofing Contractor Temecula Ca Commercial One Roofing

Edpm Roofing Costs Everything You Need To Know Kog Roofing

Eurolite Slate Rubber Roof Product Slate Roofing Slate Shingles Euroshield Roofing Roofing Rubber Roofing Slate Shingles
Rv Roof Repair The Ultimate Guide Rv Trailer Roof Repairs

Rv Roof Replacement Rv Roof Repair

Rooftop Tiles Over Rubber Membrane Concerns Beach House Deck Rooftop Membrane Roof

Power Vent Installation Range Hood Vent Roof Installation Range Vent

Things You Can Do To Green Up Your Existing Roof General Building A Porch House Roof Backyard

How To Determine The Pitch For A Shed Roof Rafter Blue Palmetto Home Inspection Shed Roof Shed Roof Design Shed Plans

Pin On Stuff To Buy

This Roof Is 2 Years What We Found Under The Torch On Felt Inside The Dwelling Some Water Marks On The Wall A Roof Insulation Flat Roof Flat Roof Insulation

Pin On Home Yard And Garden

Flat Roof Leak Repair Paint On Liquid Waterproof Sealant Roof Leak Repair Leaking Flat Roof Flat Roof Repair

Create A Beautiful Rooftop Patio With Our Rooftop Flooring Options Rooftop Deck Tiles Rooftop Deck Rooftop Patio

Simple System Existing Slope Sheet Metal Coping Sketch Drawing The Image Shows A Sketch Of Metal Coping Ins Roof Architecture Roof Edge House Extension Design

Repair Soffit And Fascia

Repair Trailer Roof Camper Repair Travel Trailer Remodel Remodel
